So you’ve decided it’s finally time to get on Facebook. Here’s how to create a group on Facebook for your church. Creating a group on Facebook may sound a bit difficult (and the length of this post may cause you to think that it is), but it’s not that hard. Just follow the steps below to creating a group on Facebook for your church. The following simple guide assumes that you know how to 1) turn on the computer and 2) be able to get on the Internet and 3) sort of find your way around with a mouse and stuff. Are you ready?
MARCH 17, 2011 UPDATE: Facebook has changed the process for starting group pages and fan pages. This guide may provide some insight, but there will be some differences with the actual process, particularly on steps three and four.
Step 1: What do I do first?
Okay, if you’re not on Facebook yet, do that. You have to be a member of Facebook in order to create the group. If, on the other hand, you’re already part of the 500,000,000 (seriously) who are already on Facebook, you’re ready to go.
Step 2: I’m a member. Now, how do I start to create a group?
Next, we’re going to actually create a group. Since the appearance of Facebook seems to change every few months, it’s kind of hard to keep track of where all the buttons are from iteration to iteration. Besides, as Facebook has evolved, it’s become more and more complicated. Never fear. Just follow these simple steps. In order to create a group…
- Go to “Account.” It is the button in the upper right hand corner. All the way to the top; all the way to the right. When you click on it, a dropdown menu will appear.
- Now, click on “Application Settings.”
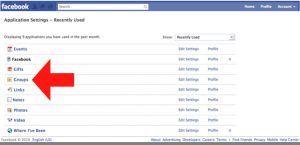
When you get to the next page, you’ll see a menu that will probably show several “applications.” One of these applications should be “groups.” If you don’t see “groups” in your menu, toggle the various options under “show” until you find a menu that displays groups. Once you’ve found “groups,” click on it.
You will next find yourself on a Facebook page featuring groups that you’ve been invited to and groups that you are a part of. In the top center of this screen, find this little button and click it:
Step 3: Finally, I’m ready. How do I go about actually creating the group?
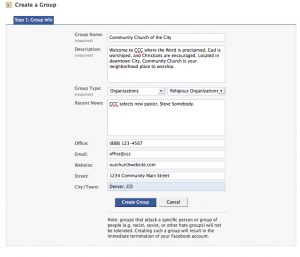
When you click on “Create a Group” you will find yourself on a page that looks like the one below. The process is self-explanatory. Simply fill out the information. Sample information below:
When you’re done, click “Create Group.” Your church is about to enter the realm of Facebook….
Step 4: Customize and fine-tune the group settings.
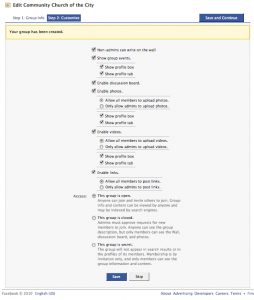
Next, you enter into the managerial details of your Facebook group. This is important, so don’t fly through this. Here is where you control wall settings, group events, discussion, access levels, and all the other significant things that a Facebook group can do and be. Look over each one, and decide whether you want to check the box or uncheck the box.
Step 5: Spread the good news…or wait and do it later.
When you proceed from the last step, you will be faced with an option to post the good news to your wall. You can if you want, or you skip to the next step.
Step 6: Send out the invitations!
The next step to which Facebook guides you is the invitation phase. You can select various and sundry of your friends (or all of them) and send them a Facebook invitation to join the group. You can even send invitations to people using their email address. Again, you can wait until later to send out invitations. This might be a good idea, because you may want to do some fine-tuning before the invitations are released.
Step 7: Getting to the actual page.
It can be a bit confusing to actually get to your group page. Where is it? What does it look like?
- Once you “create group” you will have a menu near the top of the page that looks something like this.
 Click on “Back to [Your Group Name]” to get to the main page for your group.
- You should see a screen that looks something like the one below. It is the main page for your group.
- (Alternately, you can search for your group using the Facebook search menu at the top of the screen. As long as you type in the name of your church how you created it, it should come up in a list. Click on it, and you’re ready to roll. It looks something like this:
Step 8: What about an image? Can’t I add my church’s logo to the page?
Absolutely. Time to add some pics! Once you’re on the main group page, move your pointer to the drab, bland, boring question mark that stands where your group picture should be. Click “change picture” which appears.
Upload your picture. Most likely you will click the “Upload a Picture” option that appears in the dropdown menu. There, you can select your church’s logo or picture, and use it as the profile picture.
Step 9: Add some info.
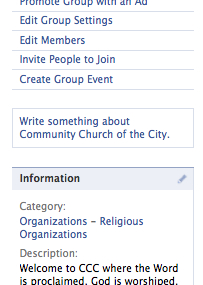
As a final bit of finesse, add some information to your Facebook Group page. On the right column, select the box that says “Write something about [Your Group Name].” Here is where you can add some additional information, an inspiring quote, a verse, or some other creative bit of content.
You did it!
Wow. How does it feel. You’re on Facebook. Not so bad, huh? If you’re used to the Facebook interface, your group page will be a breeze. Just for good measure, we’ll keep you updated with some insider tips and tricks so you can get the most out of your Facebook group, and so you can further involve members in the life of the church. Ever wondered how to start a “discussion” or what that “events” tab is all about? What if you want to add some of the other pastors to to the Facebook page so they can help manage it?
Stay tuned….more Facebook information coming.


