
There are many devices available to sound operators designed to help us improve our mixes, whether it be in a live situation or in a recording studio: Microphones, microphone pre-amps, equalizers and dynamics processors to name a few. One of the most misunderstood and often misused devices would be the compressor, which is a dynamics signal processor. Other processors in this group would include limiters, noise gates and expanders (downward and dynamic) de-essers (removes sibilance) and duckers.
The Ultimate Audio Compression Guide
Just a decade ago, church sound systems were considered fortunate if they owned one or more compressors to tame the peaks of the popular pastor’s passionate paraphrases. With the proliferation of affordable digital mixers now in our sanctuaries, we find we have a compressor / limiter / expander on every input and output. However, just because you have them, doesn’t mean you have to use them; and if you don’t know what they do or why, when, or how to implement them, then I would prefer you not touch them.
This article will help you to learn what they do and why you might want to use them. We will also give you some practical applications when describing the controls on the device. If you have a digital mixer or a DAW (digital audio workstation/ multi-track recording software) you will most certainly have some presets that you can use as starting points to help you learn how to apply the compressor to various vocal and instrumental elements. This is a very helpful benefit to the layman sound engineer for learning how to employ compressors. Practice makes perfect and spending time listening, tweaking, and learning will make you a better engineer.
So what does a compressor do?
A compressor reduces a signal’s dynamic range.
What is dynamic range?
“Dynamic range can be defined as the ratio between the loudest possible audio level and the lowest possible level. For example, if a processor states that the maximum input level before distortion is +24 dBu, and the output noise floor is -92 dBu, then the processor has a total dynamic range of 24 + 92 = 116 dB.
The average dynamic range of an orchestral performance can range from -50 dBu to +10 dBu, on average. This equates to a 60 dB dynamic range. Although 60 dB may not appear to be a large dynamic range, do the math, and you’ll discover that +10 dBu is 1,000 times louder than -50 dBu!
Rock music, on the other hand, has a much smaller dynamic range: typically -10 dBu to +10 dBu, or 20 dB. This makes mixing the various signals of a rock performance a much more tedious task.” (Presonus)
Why compress?
Have you ever been in a situation where certain parts of a performance are not heard as well as other parts? The dynamic range of a human voice can be quite wide, but in the context of a modern worship service, certain vowels and consonants might be buried and other words are clear. Trying to find a suitable level that would work on the various portions would be difficult at best, even if you focused all of your energy on the vocal. You raise the fader for the inaudible portions and would then have to lower it again for the parts that were loud enough; otherwise, they are now way too loud! This is a classic application for compressors.
A bass player on the team will occasionally want to demonstrate his God-given gift of “slapping”. It’s cool, but left alone would produce drastic differences in level from when he’s picking the bass normally. Using a compressor can contain the dynamic range (the loud transient slap from the normal level), which would result in a more consistent signal throughout the song.
Here are two applications 1) where we are taming the louder spikes and 2) where we are allowing the softer parts to be more audible.
Compressors are also used to alter the tonality of a voice or an instrument to affect punch, to reduce sibilance, yield a round smoother sound or to make the attack more pronounced. They can also be used in a radical sense to produce an un-natural sound on purpose or by chance (not knowing how to use a compressor.)
What do all of the compressors controls do?
All compressors are controlled very similarly, with some exceptions of course.
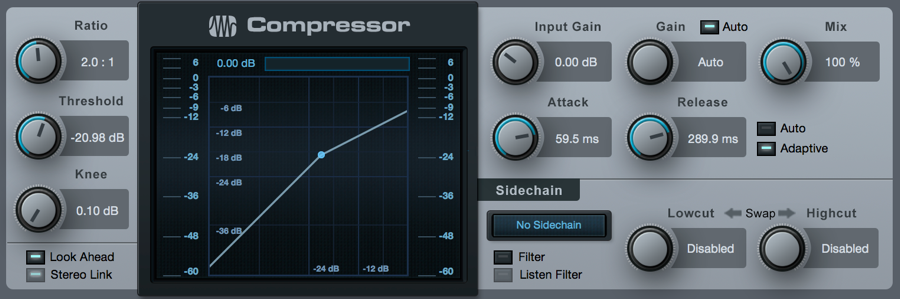
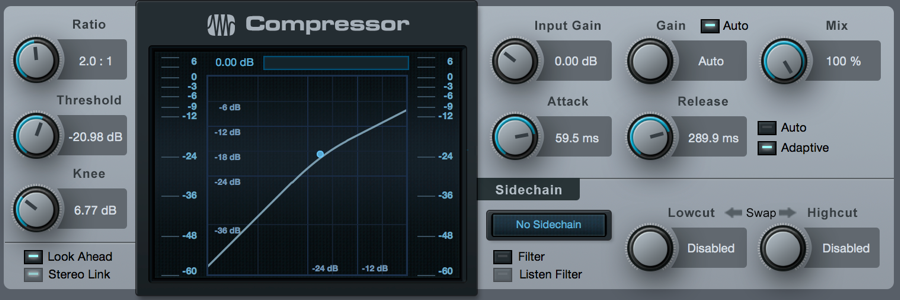
Threshold is the starting point of where the dynamics of the signal begin to be affected.
Ratio allows you to decide how much of the signal’s dynamic range you want to affect
Attack: Do you want the signal’s dynamic range to be affected soon after (Fast) it crosses the threshold or a little/lot later (Slower)? This is usually adjusted in milliseconds or seconds.
Release “is how long it will take to let the signal return to an uncompressed state, again slower or faster. Very short release times can produce a very choppy or “jittery” sound, especially in low-frequency instruments such as bass guitar. Very long release times can result in an extremely compressed sound; this is sometimes referred to as “squashing” the sound.”
Make-Up Gain When compressing a signal, gain reduction usually results in an overall reduction of level. The gain control allows you to restore the loss in level due to compression (like readjusting the volume).
You may see Auto mode. This places a compressor in automatic attack and release mode. The attack and release knobs become inoperative and pre-programmed attack and release curves are used.
Hard/soft knee. With hard-knee compression, the gain reduction applied to the signal occurs as soon as the signal exceeds the level set by the threshold. With soft-knee compression, the onset of gain reduction occurs gradually after the signal has exceeded the threshold, producing a more musical response. The term “knee” refers to the way the compression curve bends at the threshold point when represented graphically.
- Hard Knee
- Soft Knee
Compressors have many uses and many controls to affect and alter the signals in your mix. There is no shortcut to mastering them as with anything that you want to master. Below you will find some starting points, which I have lifted from the Presonus library. You will find that these are a launching pad, not a rule book. Start here, with some of the various elements and experiment by twiddling the knobs, gradually and radically, and listen to hear what changed in the sound. Remember your settings and save them for future reference.
Compression Settings: Starting Points
The following are the compression presets that were used in the popular, but discontinued PreSonus BlueMax. We have included them as a jumping-off point to get you started.
Vocals
Soft
This is an easy compression with a low ratio setting for ballads, allowing a wider dynamic range. It’s good for live use. This setting helps the vocal “sit in the track.”
| Threshold | Ratio | Attack | Release |
| -8.2 dB | 1.8:1 | 0.002 ms | 38 ms |
Medium
This setting has more limiting than the Soft compression setting, producing a narrower dynamic range. It moves the vocal more up front in the mix.
| Threshold | Ratio | Attack | Release |
| -3.3 dB | 2.8:1 | 0.002 ms | 38 ms |
Screamer
This setting is for loud vocals. It is a fairly hard compression setting for a vocalist who is on and off the microphone a lot. It puts the voice “in your face.”
| Threshold | Ratio | Attack | Release |
| -1.1 dB | 3.8:1 | 0.002 ms | 38 ms |
Percussion
Snare/Kick
This setting allows the first transient through and compresses the rest of the signal, giving a hard “snap” up front and a longer release.
| Threshold | Ratio | Attack | Release |
| -2.1 dB | 3.5:1 | 78 ms | 300 ms |
Left/Right (Stereo) Overheads
The low ratio and threshold in this setting gives a “fat” contour to even out the sound from overhead drum mics. Low end is increased, and the overall sound is more present and less ambient. You get more “boom” and less “room.”
| Threshold | Ratio | Attack | Release |
| -13.7 dB | 1.3:1 | 27 ms | 128 ms |
Fretted Instruments
Electric Bass
The fast attack and slow release in this setting will tighten up the electric bass and give you control for a more consistent level.
| Threshold | Ratio | Attack | Release |
| -4.4 dB | 2.6:1 | 45.7 ms | 189 ms |
Acoustic Guitar
This setting accentuates the attack of the acoustic guitar and helps maintain an even signal level, keeping the acoustic guitar from disappearing in the track.
| Threshold | Ratio | Attack | Release |
| -6.3 dB | 3.4:1 | 1127 ms | 400 ms |
Electric Guitar
This is a setting for “crunch” electric rhythm guitar. A slow attack helps to get the electric rhythm guitar “up close and personal” and gives punch to your crunch.
| Threshold | Ratio | Attack | Release |
| -0.1 dB | 2.4:1 | 26 ms | 1127 ms |
Keyboards
Piano
This is a special setting for an even level across the keyboard. It is designed to help even up the top and bottom of an acoustic piano. In other words, it helps the left hand to be heard along with the right hand.
| Threshold | Ratio | Attack | Release |
| -10.8 dB | 1.9:1 | 108 ms | 112 ms |
Synth
The fast attack and release on this setting can be used for synthesizer horn stabs or for bass lines played on a synthesizer.
| Threshold | Ratio | Attack | Release |
| -11.9 dB | 1.8:1 | 0.002 ms | 85 ms |
Orchestral
Use this setting for string pads and other types of synthesized orchestra parts. It will decrease the overall dynamic range for easier placement in the mix.
| Threshold | Ratio | Attack | Release |
| 3.3 dB | 2.5:1 | 1.8 ms | 50 ms |
Stereo Mix
Stereo Limiter
Just as the name implies, this is a hard limiter (or “brickwall”) setting—ideal for controlling the level to a two-track mixdown deck or stereo output.
| Threshold | Ratio | Attack | Release |
| 5.5 dB | 7.1:1 | 0.001 ms | 98 ms |
Contour
This setting fattens up the main mix.
| Threshold | Ratio | Attack | Release |
| -13.4 dB | 1.2:1 | 0.002 ms | 182 ms |
Effects
Squeeze
This is dynamic compression for solo work, especially electric guitar. It gives you that glassy “Tele/Strat” sound. It is a true classic.
| Threshold | Ratio | Attack | Release |
| -4.6 dB | 2.4:1 | 7.2 ms | 127 ms |
Pump
This is a setting for making the compressor “pump” in a desirable way. This effect is good for snare drums to increase the length of the transient by bringing the signal up after the initial spike.
| Threshold | Ratio | Attack | Release |
| 0 dB | 1.9:1 | 1 ms | 0.001 ms |
To learn more about compressors, I’ve listed some additional links for your reference.
Compression Made Easy: Demystifying Compressor Controls & Parameters And the accompany audio files
The Beginner’s Guide to Compression
Teach Yourself Mixing David Terry Alfred Publishing