
As promised in our Ultimate Guide to Church Sound for Worship Part 1, here’s part 2! We will continue our discussion of what churches need to consider in their quest for sound systems that perform well. We’ll talk about monitors and loudspeakers, dynamics processors and equalizers and simple recording set-ups. Enjoy!
Church Sound For Worship – Components Part 2
Table of Contents:
- Component 1: Monitors
- Component 2: Loudspeakers
- Component 3: Dynamics Processors
- Component 4: Equalizers
- Component 5: Recording
This article is Part 2 of a two-part series on Church Sound for Worship. See Part 1 here.
The Ultimate Guide to Church Sound! Everything you've wanted to know found here - PART 2! Click To Tweet
Monitors
Monitors refer to the devices musicians and singers use to hear themselves and the other elements that they need to hear to perform well.
Monitors can take many forms. Side fills, hot spots, floor monitors referred to as wedges, headphones and in ear-monitors that can be fed from headphone amps, wireless personal monitor systems or by way of a personal monitor mixer. We’ll discuss each type, the pros and cons of what each offers.
1965 The Beatles at Shea Stadium. What is missing from the stage?
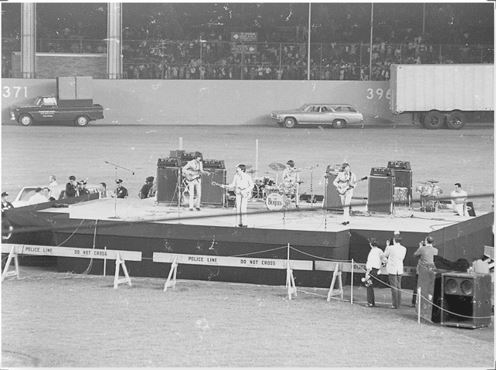
Right. There are no floor monitors. Why not? They weren’t invented yet.
It’s safe to say that modern PA systems were born the day after this concert. Bands had never played in stadiums before this. It’s interesting to note that the Beatles actually performed very well this night without monitors. How could this be?
This band spent a lot of time together, years in fact before they ever recorded their first record. They knew their parts and each other and eye contact played an important part in their performance. It’s the concept of 10,000 hours. There is no substitute for spending time spent developing your skills, or in this case, practicing together for many hours to become the best you can be. Monitors will never make up for a lack of practice. Most of us who play on a worship team are volunteers and this affords little time for playing together. Thus, a strong and false dependence on monitors has occurred and has become a crutch in many cases.
Woodstock 1969
Four years later and still no stage monitors but at least we have a FOH Engineer now. (See him on the fold-up table on the left?)
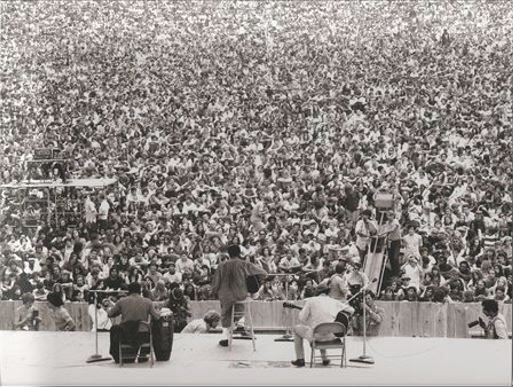
Finally in the early 70’s we see the black boxes known as wedges populating performance stages everywhere.
“Another key step was the development of more complex stage monitoring systems. Prior to this point musicians had either relied on carefully balancing their levels so they could hear everything they needed or they placed loudspeaker stacks at the side of stage which “folded back” the main mix (as those early mixers didn’t have auxiliary outputs capable of providing monitor mixes).
But the increase in the size of the PA systems meant monitors were becoming more of a necessity for the performers to not just hear and feel the performance, but also to be able to sing in tune. Pretty soon, curious wedge-shaped loudspeakers started appearing on stages, and once musicians heard them, they all wanted one (or more).
It’s interesting to note that such additions were not always welcomed by front of house engineers. For example, Mick Kluczynski observed that wedge monitors spread “like a virus” and he quickly found himself battling a secondary sound system, struggling for control of the main mix.”
I know many church sound techs that still feel the same way.
Sometimes the monitors are so overwhelming we can’t even turn on our PA system. Worship teams have become very dependent on their monitors and in many cases don’t have a sense of the room their playing in. This is understandable. Professional bands play together all the time. Church worship teams don’t play together often enough to really gel. Since there is limited time to practice together we rely on our monitors way too much.
So let’s talk about some of the different methods of monitoring so that the musician can hear what they need to and at the same time not affect what the church needs to hear.
If the church is smaller (less than 100 seats), musicians may be able to hear themselves enough from a small sound system that would fulfill the main and monitor functions. Systems like a Bose L1 for instance work well in these environments and may not require additional monitors for the musicians. Typically we never want microphones to be in front of loudspeakers but in smaller, acoustic music formats, this arrangement has shown that it can work, with limitations of course.
Hot Spots
For musicians needing to hear a little more of a focused mix, smaller monitors known as Hot Spots can do a decent job. Once the band increases in size and level they may be inappropriate for many of the players who want a bigger sound. Galaxy, Mackie and Peavey are a few of the manufacturers who make this type of a monitor.
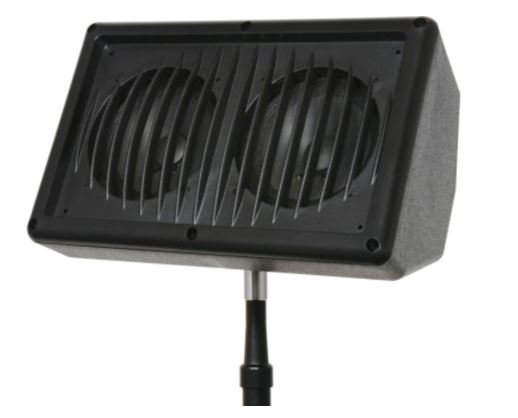
Floor Monitors/Wedges
This is the monitor that we most often see on church platforms. It is the wedge shaped box that delivers the musician’s mix. The singer or musician is hopefully standing in front of it. The wedge can typically be set up at one of two angles. It will either be passive (needs an amplifier) or a self-powered monitor (has an amplifier built-in). Floor monitors can have a devastating effect on the house mix if you don’t pay attention to where they are positioned. Do whatever you can to position the monitor so it’s not reflecting off of a hard surface, like stained glass, sheetrock, a plexi shield around the drums or into a corner. Make sure that the monitor is not aimed toward the most sensitive angle of the microphone. God designed our two ears to hear with so aim the monitor at the musicians’ ears and not at their kneecaps or hind sections.
Microphones interacting with monitors are a major cause of feedback. Sight lines are also disturbed. They can clutter up a stage and frankly mess up the house mix frequently because of their excessive levels. Volume wars occur frequently between house mix and stage and also between neighboring musicians’ monitors. I’m sure you’ve all heard:” I can’t hear myself!” When you raise the level of one monitor it’s almost a guarantee that a musician close by will ask for more of “ME” in their respective monitor. Try turning things down in a musician’s mix rather than turn up the thing they want to more of. It works. It’s more work to turn down more knobs versus turning one control up but it will help keep things in control.
I am not opposed to floor monitors on the stage. I am opposed to their excessive levels and their interference with the house mix. In-ear monitoring has become a very popular trend, from large touring acts to the smallest churches. The technology has really made it possible for musicians to hear what they need to at safe and comfortable levels when used properly. I am not saying they are absent of problems but one thing is clear: they reduce the level of sound coming off the stage significantly, which helps the congregation to hear a cleaner mix at a more appropriate levels.
In-Ear Monitoring
Ear buds that come with your iPhone are not in-ear monitors and should not be used as such. Headphones are not in-ear monitors either. In-ear monitors, (personal monitors) are inserted deeply into your ear and isolate you from the surrounding ambient noises. It’s like sticking fingers in your ears. They filter or block the undesired ambient and stage sounds from interfering with the desired sound you want/need to hear in your earphones. In-ear monitors will either be a universal or custom fit. Universal earphones are purchased off the shelf and are appropriate for 80% of the users, like these from E-Series from Audio-Technica.
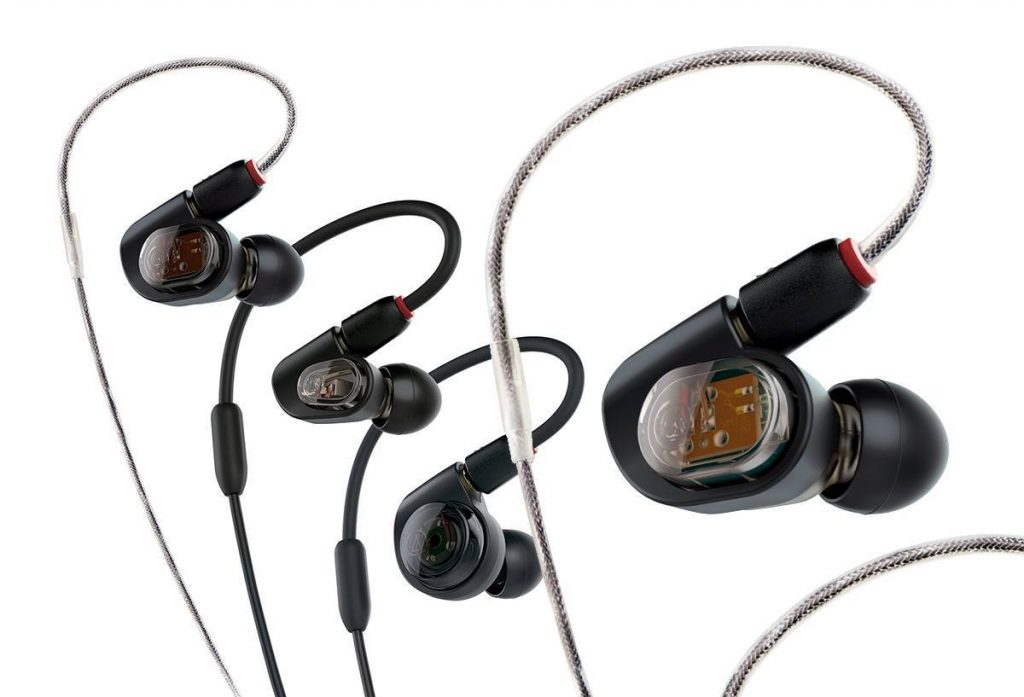
A review on the E-Series Earphones
Custom earphones will have to be fitted, typically by an audiologist. What’s the difference? Customs are the exact form factor of your ear canal and result in a perfect fit. They don’t fall out of or into your ears.
From a practical standpoint, a custom doesn’t necessarily sound or isolate better than a universal. I know that’s a general and bold statement. I am saying this because there are many universal earphones that offer excellent sound and isolation as a comparable customs would. The best reason for buying a custom is the fit. An additional benefit is the number of drivers that can be housed in the ear monitor. A very reputable custom earphone builder is Alclair. They are handcrafted and are worn by many of your favorite artists and worship leaders.

I would suggest to churches that you not buy the earphones for your musicians. They need to take ownership of this very personal item, at least in part if not the whole. If you feel the need to help them purchase the earphones, you may give them a voucher and let them buy whatever they like. At a minimum, they will have a vested interest in caring for them. The fit of an earphone is important and it takes time to get used to them. If they own the earphones they can use them for all of their personal listening and this ultimately helps them to get acclimated to how they feel and sound. Getting used to wearing them is a major part of the battle in transitioning from floor monitors to personal monitors.
Take the time to rehearse with them for a while before you ever use them in a service. I would never force any singer or musician to use something they are not comfortable with. If you have an old rock n roll guy who likes a wedge, let him use it. Younger musicians are already wearing them to listen to their favorite music on their MP3 players, so it’s easier for them to adopt personal monitors in performance.
There are so many advantages to personal monitors:
- You can listen at safer levels, blocking out offensive sound sources that have been at times harmful to our sense of hearing.
- Stereo mixes provide a more natural way to hear our mix. That’s why we have two ears. (Stereo mixes are derived from using stereo auxes on your mixer or from a variety of personal monitor mixers on the market)
- Isolation of the elements of the mix that we need to hear more of or not all.
- Personal monitor systems can cost the church less than a comparable system using floor monitors. (My good friend Ed Frebowitz, Production Monster, wrote a great article comparing the cost of stage monitors versus personal monitor systems. Click here to read it!)
- The house mix will not have to compete with the stage volume.
- Wireless personal monitors move with the musicians allowing them to hear the mix wherever they go.
If the talent is stationary, drummers, keyboard players, lethargic bass players, save the money and use hardwired personal monitor devices.
Personal Monitor Mixers
If you have ever toured with a band you may have had the luxury of having your own sound guy along for the ride. If you were really blessed you may have even had a “monitor” engineer. This is an obvious sign that you have hit the big time.
The vast majority of churches however do not have monitor engineers which has led to the plethora of personal mixers that musicians are now employing to enable them to dial in their own “monitor” mix.
What a blessing this has been to Front-of-House engineers who are now free from having to do the musicians monitors.
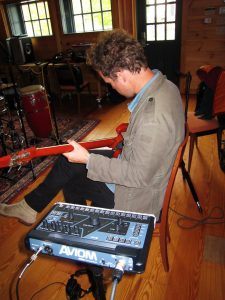
The first digital personal monitor mixers were created by Aviom. You may have seen the pervasive blue boxes on many church stages.
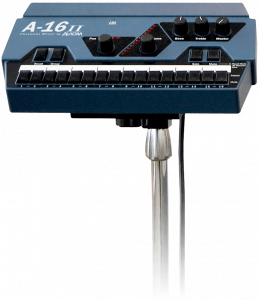
They connected to analog or digital mixers and were able to send multiple channels or groups of channels to each musician’s monitor mixer by way of a networked Cat 5 cable. The musician could then adjust the level and pan of each element and save it to memory. He could also solo, mute and group channels for convenience. They now have brand new models that do even more than the original did and IMHO, are the standard in personal monitor mixing.
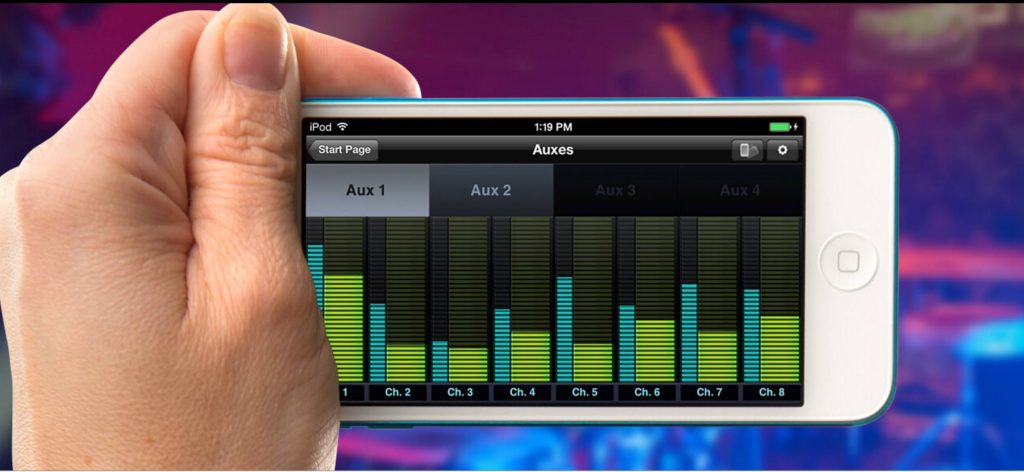
Many companies now make this type of product. Some are better than others. Some digital mixers, like Presonus AI or RM mixers, would allow a musician to adjust the mix of their personal monitor with an iOS device. This allows the talent to utilize simple headphone amplifiers that cost less than a personal monitor mixer would. So if you’re a musician who owns an iPhone and you have the right kind of digital mixer at the heart of your system, you already have a personal monitor mixer in your pocket. Who knew? You can download the QMix AI app on your iPhone for FREE demo
You can read another article written by an associate from the past, Thom Fiegle here: why churches should consider in-ear monitoring.
One of the hardest things to get used to is the feeling of isolation so I always put up at least a pair of condenser microphones to capture the room so that the worship leader can hear the congregation singing, but please stop pulling one of your earphones out to hear the congregation. The mics should be on the stage facing the congregation. Play with the placement but make sure the orientation is correct. The left microphone should be facing the left side of the auditorium and the right mic aimed the right side. I don’t want to hear the person on the left side of the auditorium singing Hallelujah out of my right ear. It’s confusing!
Loudspeakers
Woofers, tweeters, compression drivers, power handing, efficiency? All these terms can get confusing and rather than get into a technical discussion of what all these things mean I would rather spend the time helping you to understand the basics of loudspeaker selection and placement for your particular room. You want to know what time it is not how to build a watch right? Leave that to the experts. I would highly recommend hiring a consultant for any permanent installation.
This will be a simple primer in loudspeaker do’s and don’ts. Rather than re-write the book I’m going to take excerpts from a Loudspeaker Primer Presonus authored and has posted on their website below:
The performance of any loudspeaker will be influenced by the acoustics of the space in which they operate. Difficult room acoustics, combined with improper loudspeaker placement, can interfere with achieving the fidelity of which your loudspeakers are capable. This article will guide you around some of the pitfalls when configuring a PA system.
In general, the following physical features of a room can affect a sound system’s performance:
- Room size
- Construction
- Reflectivity
The size of the room directly impacts how well certain frequencies will be reproduced. For example, if you measure a room diagonally, you will discover how well that room will be able to sustain low frequencies. This may seem odd until you think about the physical size of audio waves at various frequencies. For example, a 50 Hz wave is about 22.6 feet long. (To calculate how big an audio wave is, divide the speed of sound—1,130 ft./second—by the frequency. For a 50 Hz wave, 1,130/50 = 22.6 ft.) So a room that is 45 feet on the diagonal is going to regenerate low frequencies more effectively than a room that is 15 feet on the diagonal.
When a room’s width or length correlates directly to the size of a waveform at a specific frequency, a standing wave can occur where the initial sound and the reflected sound begin to reinforce each other. Let’s say we have a long, narrow room where the distance from one side to the other is 22.6 feet. When a 50 Hz wave bounces off the wall, the reflective wave travels right back along the same path and bounces off the other wall and cycle repeats. In a room such as this, 50 Hz reproduces very well—maybe too well. So any mix will have a heavier low end.
In addition, low-frequency waves are powerful enough to cause the walls, ceiling, and even the floor to flex and move. This is called “diaphragmatic action,” and it dissipates energy and strips away the low-end definition. So if you’re in an old cotton mill, and the walls and floor are made of thick concrete that don’t vibrate much, the bass response is going to be much more powerful than if you’ve set up a show in an old warehouse where the walls are made of barge board and tin.
Maintain a High Direct-to-Reverberant Ratio
Another way a room interacts with sound waves is through reflectivity. Like most room anomalies, reflections can be good and bad. Consider the effect of a cathedral’s reflections on a choir or a piano. This type of reverberation (reverb) is quite desirable. But not all reverb is good reverb. Reflections can also cause comb filtering.
For example: If a speaker is placed near a reflective surface (such as a concrete wall), the direct sound coming from the speaker and the reflected sound coming from the wall can arrive at the listener’s ears out of phase with each other, causing cancellation and reinforcement. If they’re 180 degrees out of phase with respect to each other, they will cancel each other out.
If you are using your loudspeakers in a reverberant environment, position them so that as much sound as possible is focused on the congregation area and steered away from reflective surfaces. When you do your placement and positioning, it’s a good idea take some time to do a “walk around” of your loudspeakers, playing either pink noise or program material, so you get a feel for how the sounds are translating into the room.
Vertical Coverage
It is important to keep in mind that vertical coverage is just as important as horizontal coverage. If you are using a ground-stack approach with pole mounts, make sure your coverage matches the listening plane. Suspension of speakers will provide even further control.
Important note: Always use a licensed and insured system integrator when suspending loudspeakers. These individuals are not only trained to know how to safely suspend heavy loudspeakers, they also know how to hang them so they sound their best.
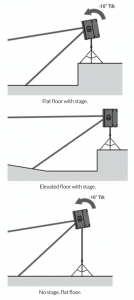
Some loudspeakers, feature dual-position pole mounts that allow you to mount the speaker atop a stand at 90 degrees or at a 7 to 10-degree downward tilt. Using the downward-tilt mount will focus the loudspeaker’s energy onto the audience and avoid destructive reflections. This is ideal for situations where the loudspeaker is mounted atop a tripod stand and placed on a stage or where the pole-mounted loudspeaker is on the floor and the coverage area is relatively shallow (portable church, meeting and conference rooms, coffee house, etc.)
Wall and Corner Loading
Very low frequencies are not directional, so they radiate out of the sides and back of the loudspeaker, as well as out of the front. If you place a loudspeaker against a wall, the rear sound propagates back into the room. This can increase output of bass frequencies as much as 6 dB, and as much as 12 dB if you put the loudspeaker in a corner.
In order to have the most control over your sound, it’s best to always start with the flattest response, so you normally should avoid wall and corner placement. On the other hand, if you need some extra bass boost, this technique may be worth a try. It is important to be aware of what’s happening and be prepared to take advantage of it or compensate for it.
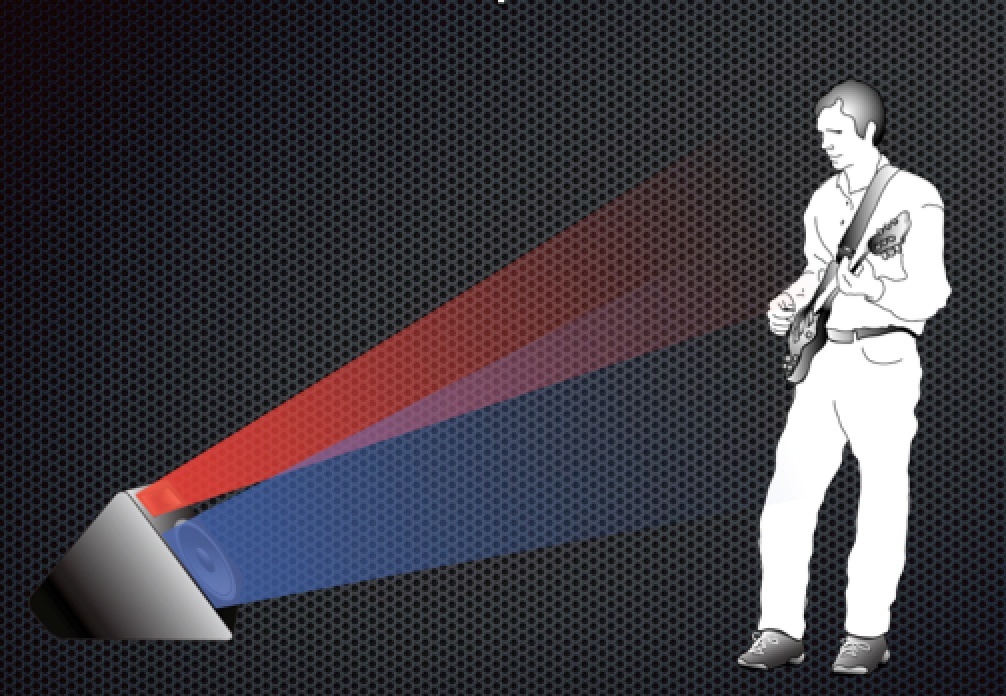
Delay Systems
In most situations, a PA system relies on two main speaker systems positioned at the front of the room to reproduce audio for the entire performance space. As a result, the level of the system is considerably louder at the front line then it is at mix position.
With a point source, horn-loaded loudspeaker (such as a single, powered loudspeaker), sound intensity is lost at a rate of -6 dB per doubling of distance. This is true regardless of tuning, amplification, power rating, or any other speaker specifications. So if your signal level is 118 dB SPL at 1 foot, at 8 feet away it’s down by 18 dB!
Here’s a simple chart that illustrates the math:
| Distance | dB SPL | Distance | dB SPL | |
| 1 ft. | 118 dB | 8 ft. | 88 dB | |
| 2 ft. | 100 dB | 16 ft. | 82 dB | |
| 4 ft. | 94 dB | 32 ft. | 76 dB |
In situations where sound must be reproduced outside of the main system’s optimum range, well-placed delay systems offer support by extending the intelligible range of the PA. Rather than relying on a pair of front-of-house speakers to fill the entire room, you can create listening zones throughout the room so that your front-of-house system only needs to be loud enough to cover the front of the room. This allows you to lower the level, giving the front-row listeners’ ears a break and getting better fidelity from your speakers.
However, it’s not as easy as just bringing an extra pair of speakers. Since electricity travels much faster than sound, listeners in the rear of the room are likely to hear the sound coming from the nearest set of speakers before they hear the sound from stage, which can dampen the attack and intelligibility of the sound and create an unpleasant phasing effect.
To compensate, you need to delay the signal going to the additional speakers. For example, it takes about 55 ms for sound to travel 50 feet. So if you put your speakers 50 feet back, you need to delay the signal by that much.
- There are loudspeakers and digital mixers that have the delay tools built in.
- If neither your mixer nor your loudspeaker has a built-in delay, use a separate delay processor to achieve the same results.
Delay Basics
Delay speakers allow you to run the main speakers at a lower volume, as they relieve the mains of handling high- and mid-frequency content for part of the space. As a speaker is pushed harder, the edges of its frequency response begin to distort, so by easing the demands on the mains, delay systems increase fidelity sonically, as well as mechanically. This also means that the front row doesn’t need to be blasted just so the people at the back can hear the show.
The goal of distributed sound is to extend the intelligible range of the system, without killing the front of the crowd with excessive level. As noted earlier, sound travels much slower than electricity, so the audio coming out of the delay system will arrive to the listeners before the audio coming out of the main system. Without proper alignment, the multiple arrival times create confusion to the listener and sonic definition is lost. Speech and beat transients become less intelligible. In large venues, this can actually create a flam or echo effect. By delaying the audio going to side and rear fills, you can create a cohesive listening environment for the entire audience.
It should be noted that frequencies in the sub-bass range of a delay system do not require distribution. In fact, a delay system’s high pass filter should be rolled up as high as 300 to 400 Hz to avoid sound going back toward the stage as low frequencies become omnidirectional.
When placing delay systems, the main goal is to maintain intelligibility of the PA, especially in the vocal consonant range (2 to 4 kHz). However, this goal is achieved by overcoming different obstacles depending on whether you are indoors or outdoors. In both situations, the delay system should be set where the main system’s intelligibility falls apart. As with the main system, the placement of the delay systems will determine how successfully you are able to achieve these goals.
Inside. Indoors, you are trying to overcome the direct-to-reverberant reflections. The location of the delay system is dependent on the critical listening area (typically just behind front-of-house). Your goal is to find where the direct signal-to-reverberation ratio has reached about 50/50. At this point, the reflections in the room are at an equal level to the direct sound of the PA, and vocal intelligibility is lost. Listen for a lack of intelligibility in the vocals and find the point at which the drums and rhythm section don’t feel tight.
A great way to find the best position for your delay speakers is to set up and tune your main system and play audio through it. Play something similar to what you will be mixing later. Set the level so that it is comfortable from the front row. Walk backward away from the main system until you notice a lack of clarity. This is the beginning of the space that will need delay-system coverage.
Outside. Outdoors, you are trying to maintain level as the noise floor of the crowd begins to be at equal level to the PA in the intelligibility range. When working outside, the delay system is used to overcome outdoor noise, including (but not limited to) crowd murmur, concessions, generators, tractors, babies, etc. At this point, the main system needs more support in order to deliver the same perceived loudness as you get further from the source.
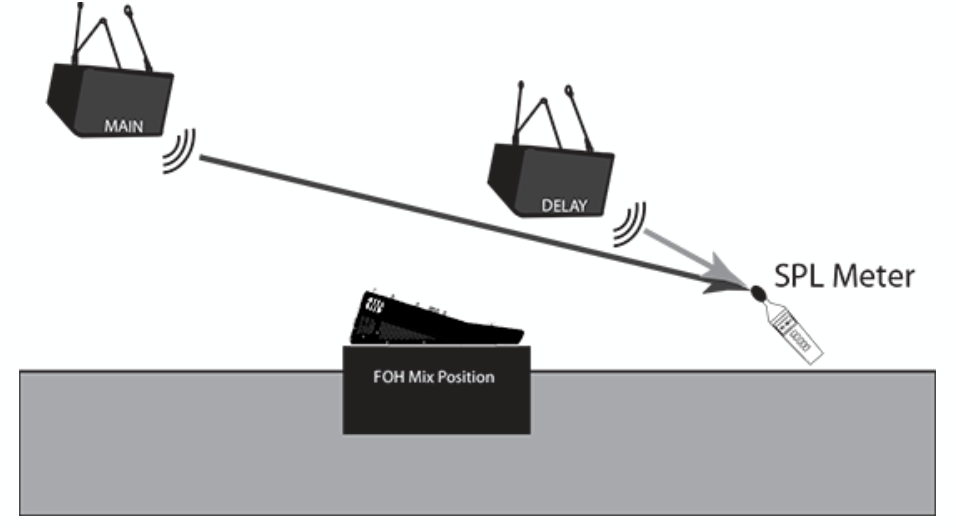
Once you have positioned and delayed your satellite system, use an SPL meter to match the output of the main and delay systems at the measurement point. If you are standing 20 feet from the left side of the main system and 30 feet from the left side of the delay system, and if the output of the main system is 85 dB, the output of the delay system should also be 85 dB.
Sub Alignment
Delaying subwoofers relative to their full-range counterparts compensates for the cancellation or reinforcement of low frequencies that occurs when the same frequencies are reproduced by two sound sources set some distance apart. Low frequencies in the crossover region between full-range and subwoofer have wavelengths that are several feet long—the wavelength of a 150 Hz wave is about 7.5 feet—which means that reinforcement and cancellation will occur as the waves interact in the room.
Delaying a subwoofer will compensate for this effect when the loudspeaker is about the same distance away from, or in front of, the subwoofer, as specified in the setting. As room acoustics will influence effectiveness, we recommend listening tests using different delay settings, in conjunction with alternate polarity settings, to determine the best results.
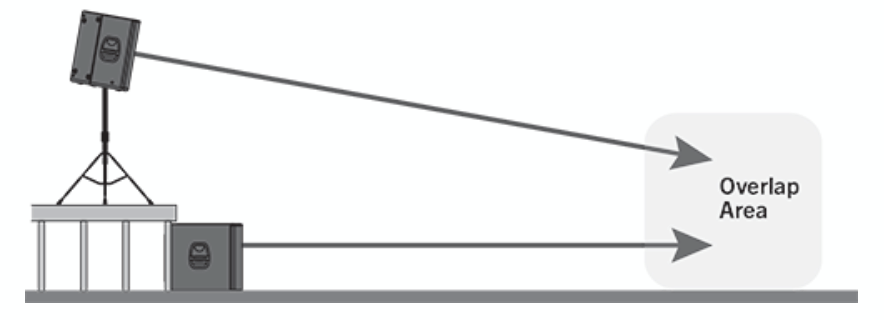
If you are aligning for a custom installation you will need to do some calculating:
Find the spot in the room where coverage from the main speakers and the subwoofers overlap. Measure the distance from the overlap area to each speaker location. Subtract the smaller distance from the larger. Divide that number by 1,100 and apply that delay value to the speaker that is closest. Keep in mind that the overlap area may be behind front-of-house.
Real-World Delay System Example
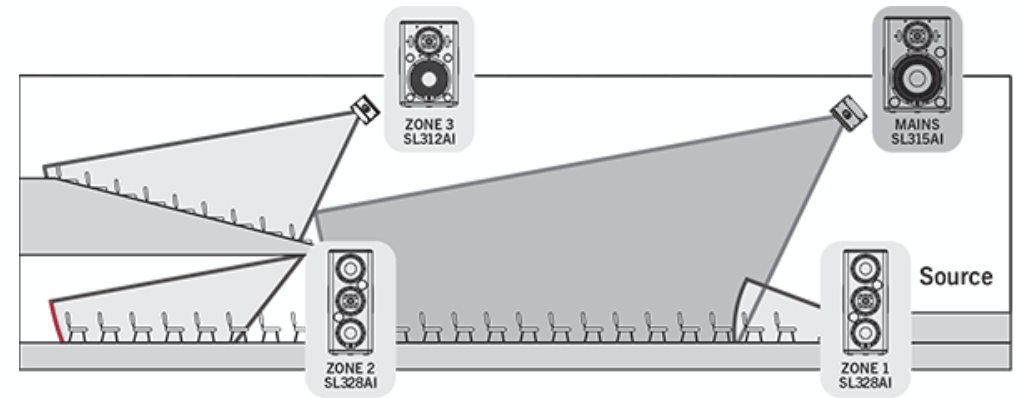
The goal in a complicated system with loudspeakers distributed throughout the venue is to delay each satellite system to its counterpart in the main system (e.g., the left front fill to the left front-of-house loudspeaker).
- Delay the main system relative to the source on stage. On small stages where the guitar amp and drum kit can be clearly heard above the front-of-house (FOH) loudspeaker system, delaying the main system can “move up” the backline so that it aligns with these instruments and decreases blurring in the mix. This will tighten the overall mix and give it more punch.
- Delay the front fills relative to the main system by delaying each side of the system independently (e.g., delay the left front fill to the left FOH loudspeaker).
- Delay subwoofers relative to the main system. How you do this will depend on how your subwoofer system is positioned and configured. In general, you will want to delay each subwoofer relative to the full-range loudspeaker closest to it.
- Delay down-fill speakers (upper and under balcony) relative to the main system, again delaying each side of the system independently.
System Configuration Suggestions
The following discussion and graphics will demonstrate some system configurations for common rooms. The size and shape of your room and the application for which it will be used determine, to a large extent, how many speakers you will need and where they should be placed. In every situation, keep in mind two important design factors: your loudspeaker’s coverage pattern and half-space loading. Rotating the cabinet changes the horizontal and vertical coverage. If you are using conventional (non-coaxial) loudspeakers, find out what their coverage pattern is and figure accordingly.
When configured for stereo use, make sure the cabinets are not placed too wide for the room or too far back into the corners. Too wide of a placement will direct too much energy onto the walls and can potentially add destructive interference to the room. Adjust the left and right speakers, as well as the toe-in angle, to produce the best stereo image. If a room is very narrow, a mono cluster might be a better choice than stereo.
Wherever you place your loudspeakers, you should be aware of half-space loading. Half-space loading occurs when a speaker comes in close contact with, or touches, a hard surface like a floor or wall. As its name indicates, this type of summation happens when the circular radiation of the speaker is blocked by a hard surface and forced to radiate in a crescent shape. Depending on the proximity and position, there may be a boost in low-frequency energy. Testing your speaker placement and doing some critical-listening tests will help determine the best final location for your loudspeaker system.
If your speakers are sitting on the floor, you can expect a certain amount of half-space loading. If you are using your speakers as floor wedges, you might want to experiment with using a high pass filter to reduce low energy. In some cases, this might improve intelligibility.
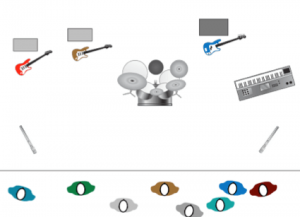
Stereo System
A stereo system allows panning and adds depth to the acoustic image. This is good for speech reinforcement and greatly enhances live or pre-recorded music. Locate speakers to give the best horizontal coverage. Ensure that the listeners are well covered by the pattern.
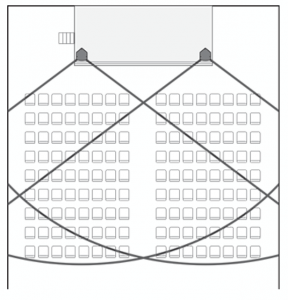
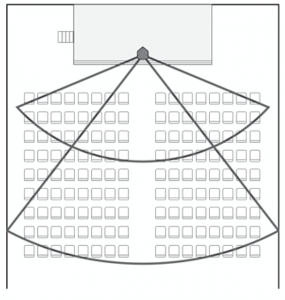
Mono Cluster with Down Fill
Center or mono systems can provide a simple, economical solution for venues where speech intelligibility is the priority, rather than music. As with a stereo system, make sure the coverage pattern of the speaker focuses the energy on the audience.
This graphic actually shows two speakers. The upper speaker is for throwing to the back of the room, and the lower speaker covers the space in the front of the room, closest to the stage.
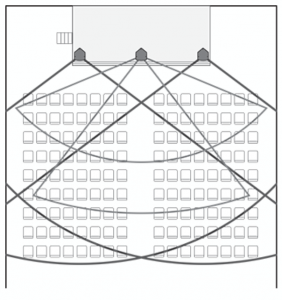
LCR Systems
An LCR system is a stereo system with a center speaker added. This configuration allows panning and adds depth to the acoustic image. This type of system will provide more control than a basic stereo system and is ideal in situations where music and speech intelligibility are equally important.
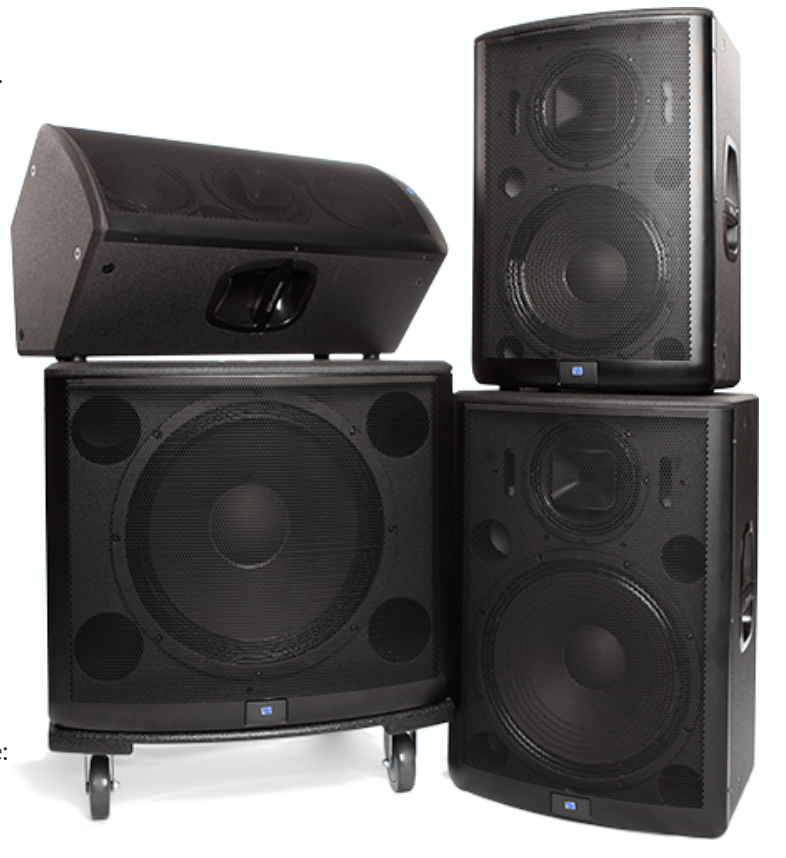
Presonus and Worx Audio Loudspeakers
Dynamics processors
These are the tools that allow us to limit the dynamic range of individual microphones and instruments or of an entire mix. Compressors, Noise Gates, Downward Expanders and Limiters are all considered dynamics processors. You may have used one or more of these in your experience. Often we will use a compressor to reduce the dynamic range of an instrument or vocal whose level fluctuates. It’s almost like having an automatic volume control. Our fingers aren’t fast enough to adjust the fader when the level gets beyond where we would like it to be so we set the controls on a compressor to bring the loudest parts down to an acceptable level, thereby reducing the dynamic range, or the difference between the softest and the loudest peaks. Once the louder levels have been reduced we can then bring up the softer parts to hear them better. If you don’t know how to use a compressor, please keep your hands off of it until you do learn. A huge advantage of digital mixers is that there are compressors, limiters, gates/expanders on every input and output, many brands and models with presets or starting points for specific instrument and vocal applications to help you learn how they function. It’s like having a built-in audio professor.
Noise gates are also dynamics processors. The simplest and most basic use of a noise gate is to automatically mute a microphone on a drum that isn’t being played for instance or the noise from the guitar player’s amp in between songs, etc. Think of it as a door that opens and shuts depending on the level you set. If I yell loud enough the door opens and the sound is allowed to pass through. If I speak below the set level (the threshold), the door, or gate, stays closed and the sound is muted. Whenever we can keep microphones muted when they’re not being used, it will make our system sound better and reduce the potential for feedback. The trick is setting the threshold so that it doesn’t cut off the desired sounds. This takes time to learn how the various controls work together.
Limiters are basically compressors that are set to stop the level from going anywhere beyond a set point. We refer to them as brick wall limiters at times to protect things from blowing up. Get the point?
Many times we will have the main output of a mixer or an aux bus (Monitor) feeding an in-ear monitor, pass through a limiter to prevent the loudspeakers from bursting into flames (LOL) or damaging the ears of a musician.
Click links below for more information.
Equalizers
Equalizers can make or break a mix. When you know how to use them they can really help to cut or remove offending frequencies or embellish the tone of a vocal, or an instrument. I liken them to spice in the hands of a chef, too much and you’ve ruined the dish, not enough and the mix may sound thin. It takes time and practice to develop your ear in recognizing what it is you may want to alter. You must remember that EQ (short for equalizer) cannot make something sound like it’s not. An equalizer is basically a volume control for a certain bandwidth of frequencies. It can cut or boost the level of those frequencies by a certain degree measured in dB (decibels).
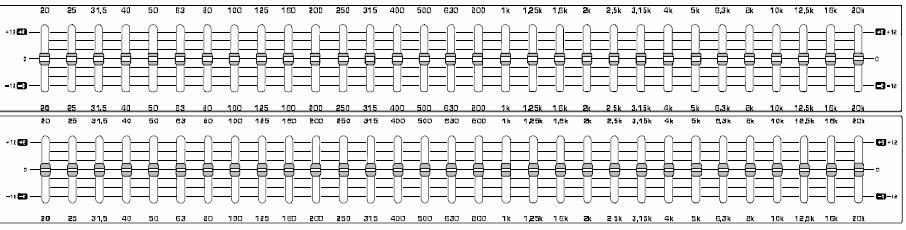
Graphic equalizers are typically used for the main loudspeakers, fills and floor monitors. Typically you want one for each floor monitor and your main speakers. These are used typically to adjust for room anomalies, reducing feedback. Once adjusted, they shouldn’t have to be fiddled with too much if at all. So for instance if you had two loudspeakers, one for each side of the room and six floor monitors, I would recommend having a mono 31-Band graphic Equalizer for each of the speakers. Another name for these are “1/3 Octave Equalizers” (see Picture below). They divide the frequency spectrum into 1/3 octave from 20Hz (the very lowest range of human hearing) to 20kHz (the highest frequency humans can hear). If you want to save some space opt for four stereo 31-band graphics. In the analog days it was common to see a rack full of graphic EQs. Today just about every digital mixer has multiple graphic equalizers built in.
The mixer’s channel equalizers on the input strip are used for affecting the tone of the specific microphone or instrument in that channel. On less expensive mixers the channel EQ might have no more control than your car stereo has, High and Low (Treble and Bass). Not much help here unless you’re using them to cut frequencies as they are fixed typically at 100 Hz and 10KHz. These are referred to as a Shelving EQ.
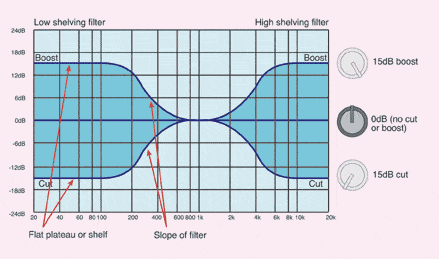
When you crank the bass up on an EQ like this, you’re not only boosting 100 Hz, you’re raising the level of every frequency below 100 Hz down to 20Hz. This could put quite a strain on your PA System especially if you’re boosting the kick drum and the bass guitar. The same goes for the High EQ control, which is also a shelf. You may think you’re adding some “AIR” to the sound by boosting this control, but in essence what you have done is boost every frequency from 10kHz up to 20kHz .The best use for a fixed, shelving EQ would be as filter to cut frequencies, much like a hi-pass or lo-pass filter would.
A step up mixer may have three bands of EQ per channel. The third being between the High and Low EQ called the mid. This controls the midrange frequency. Some mixers have fixed Mid EQ controls set typically at I KHz (1,000 cycles per second) with a Peak filter, not a shelf, set to an octave wide for instance. Boosting or attenuating frequencies an octave wide, centered at 1KHz, is not the most useful control. It’s better than nothing but not as useful as a control that would allow you to choose the frequency that needs a boost or a cut.
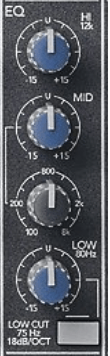
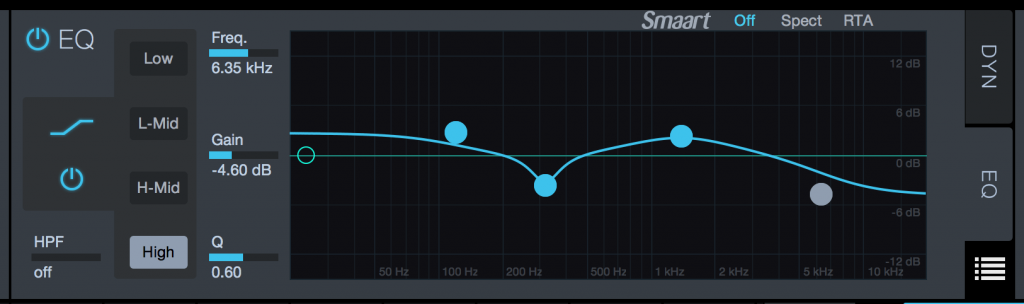
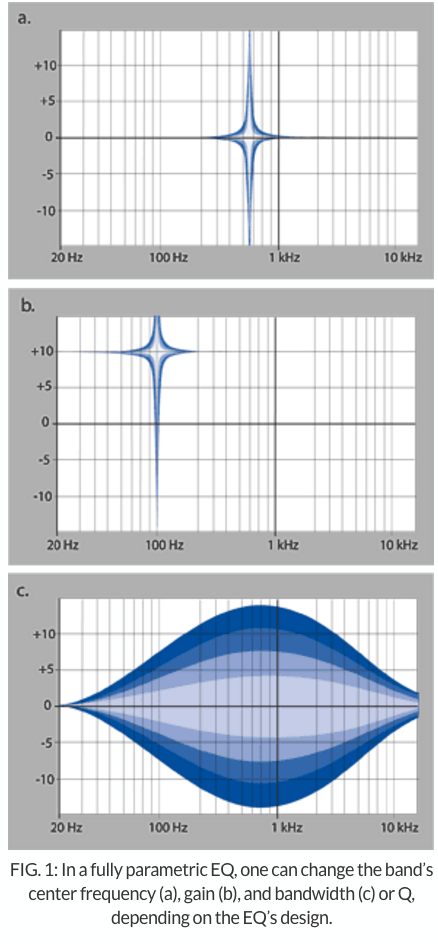
More expensive mixers may have two controls for the Midrange frequencies. One to allow you to choose the frequency you need to affect. It’s a tunable control and allows you to “sweep” through frequencies to find the one that you want to change. The second control raises or lowers the level (Boost and Cut). This type of EQ is known as a Semi-Parametric. The next step up on a mixer may divide the midrange into two sections, upper and lower Mids. Each would have a selectable frequency and gain knob. Again better EQ sections may add a control to each range called “Q” which stands for the quality of the bandwidth. By adjusting the Q we can make the bandwidth from very narrow to much wider. This type of EQ is called a“Parametric”.
A basic principle is to typically cut frequencies with a narrow Q and boost with a wider Q.
Before you touch an EQ learn how to identify frequencies in the mix. This takes time to develop. Listen to lots of music, critically. Deconstruct it. Purchase some ear training apps for your iPhone or computer and spend some time learning how EQ affects individual instruments and vocals and how it affects an entire mix. Hear EQ is one such app for $3.99 on the App store. Another would be Quiztones. Learn how to identify feedback frequencies so that when you first start to hear the initial ring you’ll know which frequency it is, enabling you to turn it down before it turns into full-blown feedback driving the masses from your sanctuary.
For a deeper dive into Equalization click the links below.
- Equalizer Terms and Tips
- Subtractive and Additive EQ (Video)
- Difference between Semi-Parametric and Parametric EQ (Video)
Recording
Recording sermons for podcasts, outreach, etc is basic for church sound for worship. requires a much simpler solution than for a worship team that wants to produce original music for distribution to the masses on the web or on a disc. To record sermons, bible studies, spoken word and speech all you will need is a device to record the content to.
By assigning an aux or a stereo send to a CD, analog (Really?) or digital tape recorder or to a computer with recording software you can create a separate mix for your recording. In addition to the pastor’s microphone you may want to add a pair of audience microphones to the recording to put the listener in the same environment as one who would be there in person. Listening to a recording with room microphones is like being there.
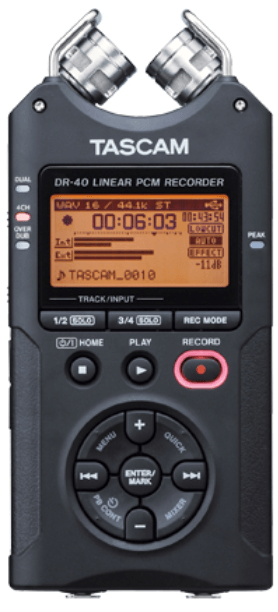
If your mixer doesn’t provide the necessary auxillary busses or separate sends to a recording device you could opt for one of the many portable recorders that are available in stereo or multitrack formats. You would simply send a copy of the house mix from your console to the inputs of the portable recording device, which is usually saved on an internal SD card. Many have built in ambient (audience) microphones built in to simultaneously capture the sound of the congregation in the room. You would then extract the SD card from the recorder to transfer files to a computer with editing software. TASCAM is a reputable company that makes a variety of recording devices like this.
Or you could simply send the mix to a computer that has recording software built in. Whether it’s a Mac or a PC, there is a plethora of recording hardware and software available for any platform, for any budget, depending on how many tracks you want to record at the same time and how deeply you want to edit or produce.
For instance Garage Band comes standard with all Mac computers. It is a very intuitive recording application that allows you to edit and deliver to the web or burn the recording to a CD. There are USB microphones, which could be used to record the church service to this app. You can even aggregate 2 USB microphones for stereo recording applications with Garage Band. USB microphones have come along way and are more than adequate for producing very good recordings.
If you want to record to a computer from your mixer or from microphones, you will need an” interface”. Please don’t expect to get a quality recording by using the computer’s internal sound card. Trust me! Interfaces can have has few as 1 or 2 inputs and outputs up to as many as you can imagine. The more inputs you have equal the number of multiple tracks you can record at one time. If you’re only doing sermons or stereo recordings of your services or meetings, a mono or stereo interface is all you’ll need. If you want to record 16 channels of audio at the same time with each channel getting their own track on the recording then you will need an interface with at least 16 inputs.. For lots of tracks, sonic quality and highest resolution you’ll be surprised just how affordable they are and virtually all interfaces come with recording software. Again I will reiterate, only a few companies design, produce and integrate the hardware and the software. Many interfaces come with third party software, which can prove very frustrating to a novice.

A big reason why churches are recording the musical portions of their services onto multiple tracks is to be able to do “Virtual Sound Checks”. Imagine being able to record a worship service on a Sunday morning and then come back mid-week to playback the individual tracks of the worship team through the same mixer in your church and practice mixing the house and the monitors without the band even being there. This provides a host of advantages for volunteers who need more time to practice honing their skills. Many digital mixers have the computer interfaces built right into them to enable you to record the multiple channels of the mixer to the individual tracks of the recording software and then to play the tracks back through the same channels of the mixer without re-patching. You are probably saying “That’s great if I had a digital mixer like that but we have an analog mixer. What can I?”
Do not fear there are ways to do Virtual Sound Checks with analog mixers as well.
The Joe Co Black Box recorder is one solution and the Allen & Heath ICE is another option that has fewer inputs but costs less and in essence does the same thing they save your audio performances to simple USB drives.
With Dante and AVB networks you’ll also be able to record and playback 64 channels of 48KHz audio over the same network to any devices that are network and record-ready.
This article is Part 2 of a two-part series on doing Church Sound for Worship. See Part 1 of the Ultimate Guide to Doing Church Sound for Worship here.
Test Drive Sharefaith’s Award-Winning Products
Sharefaith is the only service that combines church websites, kids Bible resources, graphics, video, media, giving and donations as well as presentation and print. Try a free trial today!