Mixing for church worship – The ultimate 10 step guide. As a volunteer sound tech for your church, you probably have not done sound for a living and are looking for practical ways to get better. Here are ten helpful tips & tricks that have helped me over the years and will certainly bring your mix to the next level.
1. Relationship and communication with team.
If you are a member of a team, (I consider the worship and tech team to be one, not two) it will pay huge dividends if the relationships are strong. Imagine a guitar player or drummer, whom you don’t know that well, playing a little bit louder than usual. You say to him: “Turn down your amp!“ What would his response be? Not nice. However, if you have spent some time with him connecting on a personal level over coffee, getting together outside of church, you know his name, the music he listens to, what he does for a living, etc., the conversation might go like this:
Me: Hey, Johnny, I need a favor.
Johnny: What is it bud? Anything.
Me: I need you to turn your amp down.
Johnny: No problem.
A strong relationship solves a technical problem. Phil 2:1-11
2. Develop your ears.
The church may have techs, but they may not be musical. Mixing is a combination of art and science. It is of no value to teach someone the art of mixing if they have little to no interest in music. Listen to music often, especially to the types of music your worship leader listens to. It will help you to understand what he wants to hear.
Learn how EQ can help or destroy a mix. A very affordable program for understanding EQ, tone, and level would be Quiztones. HearEQ is another program. Typically, cut before boosting a range of frequencies. Cut narrow, and boost a little wider.
3.Know your mixer and signal flow.
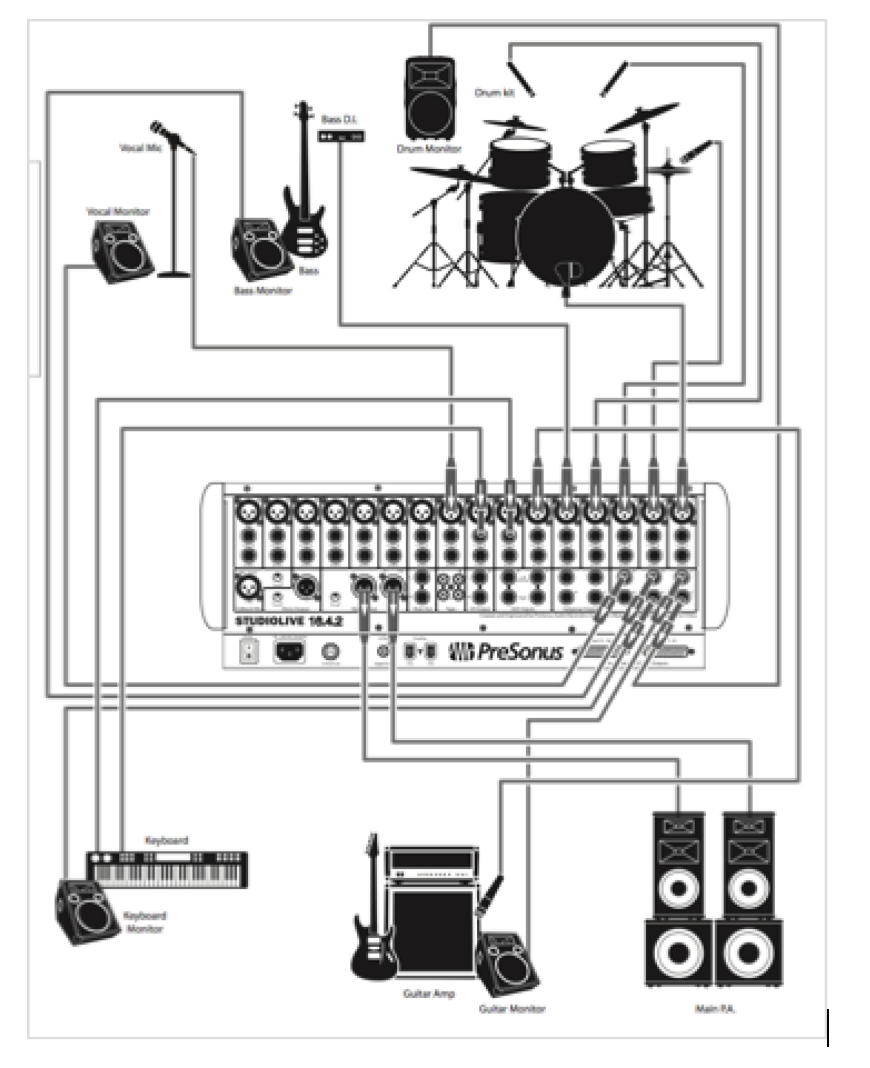
Mixing is fun, but what you’ll be doing most is locating the problem, or finding out why something isn’t working. Knowing how your mixer and system is wired will help you to do this much faster. Make a diagram of the system to know where all the in’s and out’s go. Organization, labeling cables and keeping things the same will help to remove the frustration and chaos that can occur when it isn’t working. Know your mixer like the back of your hand, so that you can keep your eyes where they need to be: on the band.
4. Gain structure.
Recently, I was asked to help train a church that hadn’t done a proper sound check in 8 years. You can imagine the look on my face. The foundation of a great mix is getting levels of every input optimized first. There are different ways to do this. I use a method called target gain. The levels are set during sound check. You may also want to do a line check before sound check to make sure everything that will be utilized during worship works.
5. Sound check vs. Rehearsal
Sound check is for the sound operator; the rehearsal is for the band. Sound check is done before rehearsal. It’s necessary to set proper levels for every microphone. This can go very quickly if the musicians are cooperating. 5-10 minutes is all you’ll need. Once set, the band can rehearse. You may want to view a video I did a while ago called Mixing the Church. This will give you a good idea of what this looks like.
6. Hi-Pass Filter
This is also known as a Low-Cut filter. It’s located on every channel on your mixer. It lets the high frequencies pass, and it attenuates the lows. I typically apply it (turn it on or adjust) to every vocal mic, guitar, snare drum, hi-hat and cymbal, strings and winds, etc. The things I don’t apply it to are instruments that produce low frequencies like bass guitar, kick drum, etc. This will remove the rumble that is so common in stages and will allow these microphones and instruments to be heard more clearly in the mix.
7. Stereo vs. Mono
If God wanted us to hear in mono, he would’ve placed one ear in the center of our foreheads. Actually, we can hear things easier when we have a stereo field to place vocals and instruments in. If you have the capability of mixing in stereo, you may want to try it. It allows you to hear the lead vocal much easier without the need for extensive equalization by physically separating it from other elements. Lead vocal, kick, snare, and bass guitar would be center, and everything else could be placed to the left or to the right in varying degrees by utilizing your pan control.
8. Tame the stage.
You will never get the mix right in the house if your stage is too loud. Get the levels right for the mains before the monitors. Try to get the musicians to hear more of the room and the stage with less monitoring. It’s the floor monitors (wedges) that are responsible for the excessive levels.
9. Use your mutes.
Shut microphones off when not in use during worship. This will allow your system’s maximum gain to be realized and greatly reduce the potential for feedback.
10. Use your groups.
It is easier to mix with fewer faders than with more. If the music director wants you to bring the drums up in the chorus, do you really want to push eight faders of drums up and down while trying to retain their levels? I think not. Assign these to a group, and mix with your groups. Vocals, keys, guitars and any other group of instruments that you may want to control can be assigned to a group. I could mix a whole show with two groups: band and vocal.


